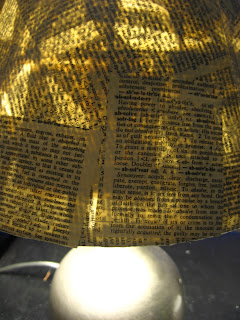
As promised in my previous Budget Anthro post, I put together my own version of Anthro's Well Defined Lampshade! (See it together with my DIY vintage book lamp base!)
Materials I used :
1 plain Lampshade - $5
(I used a cheap one I already had from Target, but you can use any plain colored lampshade; one with bold prints may show through the pages when the lamp is lit.)
1 bottle of Mod Podge - approx $8 for 16 oz bottle
(I recommend getting the weekly coupons from Michaels and using that to purchase a bottle if you don't already have one!)
1 Thrifted Dictionary -$2
(You can use any old book, but I easily found a vintage dictionary at a local thrift store. You only need about 10-15 pages of a decent sized book. My book was a little over 9 x 11")
Scissors, Paint brush or Foam brush ( I switched to a foam brush after trying a large paint brush, it worked a lot better for me!) and Tray for Mod Podge (I used a Chinese food takeout container)
Project total: $15 (though I only spent an extra $2 since I already had mod podge and a lampshade.)
Keep in mind, Mod Podge can get messy so put something down to protect your work surface! I used some Kraft paper that came in a shipment box.
Cut your pages into strips, then into smaller rectangles, trimming the empty space around the text. You can cut as large or as small pieces as you would like, depending on the look you want. I tried to get close to the size used on the Anthro version, though I probably could have gone a little smaller.
Begin applying page pieces by first painting a layer of Mod Podge directly onto the lamp shade, then place pieces onto shade, and paint Mod Podge over the piece, smoothing out bubbles with your fingers and wrapping paper over edges of shade.
Repeat this process and continue to cover shade with book page pieces. I did 3 layers of pages, you can do as many as you want to get the look you want when the lamp is turned on. Fewer layers = more light coming through the shade.
Let each layer dry before you do the next, and pay attention to pieces bubbling! Smooth them out gently with your fingers.
This is how the shade looks with 1 and 2 layers of pages respectively.
By the third layer your shade should look like this!
Do a final top coat of Mod Podge to seal everything up, and you're done! Easy peezy lemon squeezy.
Enjoy your new lampshade, and thanks for reading!


Hi, found this through Pinterest...looking forward to trying it! Question: I see you used the "matte" mod podge, do you think the "glossy" one would make a big difference? Not too familiar with mod podge.
ReplyDeleteErica - the only real difference I think would be that glossy mod podge is gonna make the shade very shiny when it is done! The Matte has a slight sheen to it, but otherwise is very subtle. Glossy is going to be much more noticeable in terms of shininess, so if that's what you'd like then I say go for it! Otherwise Matte is probably best, but if you only have glossy and you don't like how it looks you can always buy a bottle of matte and do a coat on top, or find a matte finishing spray at a craft store that will tone down the shine. Hope that helps!
DeleteHey! Found you via Pinterest and I LOVE this idea! Thanks for sharing it with us :)
ReplyDelete-Bonnie @ Revolutionaries
www.revolutionariesblog.com
Hey Mari, I found you via Pinterest. Thanks so much for this. I notice you mention using coupons to save on the Mod Podge cost. Here's an even better solution: I make my own! Buy a large container of wood (white) glue. Mix some in a glass jar with water (1 third glue to 2 thirds water). Mix well and use exactly as you would use Mod Podge. It dries exactly the same way, too. If you don't want the mixture to be quite so runny, you can add a little more glue. It keeps well with the lid on the jar - just mix well when you use it again. I had to "invent" this some years ago before we could even buy Mod Podge in South Africa, where I live. Now I see no need to buy the much more expensive commercial version!
ReplyDeleteAnother Pinterest connection here... To further above comment about white glue...have also been doing this for years to create my decoupaged affirmation mirrors. Every year I stock up during school supplies shopping when many office supply have white glue for as little as .10 and .20 a bottle! Just think how many lampshades you could cover for next to nothing!
ReplyDeleteHi, another pinterest user here! I was just wondering how much light the 3-layered version gave off? I was thinking of doing this for when I move into my college dorm, and I want to use it as a desk/bedside lamp. Thanks!
ReplyDeleteThanks for the Mod Podge suggestions everyone! I hope it will help other budget conscious crafters!
ReplyDeleteSydney - as for the light level, the shade is fairly opaque with 3 layers of paper, so it only allows light from the top and bottom of the shade. Perfect for a nice soft dimmish light.If you're looking for more light, I recommend fewer layers, however be mindful of placement and shape, as the light shining through can make it look odd if placement is uneven. One way to combat this is cutting specific shapes from the book pages, and gluing them in a design that light will show through when turned on! Similar to this: http://www.curbly.com/users/diy-maven/posts/10167-make-an-anthropologie-inspired-lampshade
You could also use larger lampshades that allow more light out of the top and bottom! Good luck!
Hey there! Just wanted to let you know we featured you in our Favorite Find Fridays post over at Whimsically Homemade. We used one of your pictures and linked back to you. If that's a problem let us know and we'll remove it immediately. Thanks for your great inspiration!
ReplyDeleteI'm flattered! Thanks ladies!
ReplyDeleteFound this through Pinterest - love it and will definitely be re-pinning for a future project! Thanks for sharing!
ReplyDeleteI love this idea and have been searching for a way to do this! My only question, can a lamp with these shades be left on for a long period of time, or will overheating and potential fire occur?
ReplyDeleteThis comment has been removed by the author.
ReplyDeleteGreat idea for my daughters old bedroom. I've turned it into a library. Thank you!
ReplyDeleteSeems to me you could make your own wheat paste like we did in Elementary School for Paper Mache'; $8 for glue is a ripoff!
ReplyDeleteI think I will try this but use scrapboik paper with print and color on the kamp. It will cost more but be more of what I would like.
ReplyDeleteSorry, resurrecting this post for a sec! I just wanted a little feedback since my lampshade sadly has a bold chevron pattern.. I don't know if I want to paint over this before starting, get a plain lamp shade, or leave it as be and Mod Podge over it.. Your thoughts? ^^"
ReplyDeleteEven if you paint it, the pattern on the shade is going to show when the light is on. Your better of starting with a plain shade.
DeleteFantastic and very helpful, will have a go using old recipe pages and display on shelf in my kitchen.
ReplyDeleteI love that idea!!! I have a lot of my moms handwritten recipes. I will make copies of her recipes and add in pages from an old cookbook.
DeleteWhat a lovely idea. Will definitely try it
ReplyDelete