NavBAr

Thursday, August 25, 2011

Projects: Hand Stitched Gifts

I've been practicing my embroidery lately, and made this little portrait to send to my sweet friend April of her precious daughter! (She loved it!)


I also embroidered these tea towels as a wedding shower gift to my dear friends Shannon and Duncan!
The one on the left I have posted before, but I made the teacup embroidery as it's match and gave both to them.
I used vintage embroidery patterns from the blog My Transfers.


Thanks for reading!

Thursday, August 18, 2011

What I Made Today: Mason Jar Soap Dispensers

I've despised our soap dispensers for ages. The cheap, "stainless steel" kind that rusts without a moment's hesitation,  drips soap out of the seal, and struggles to dispense properly. 
They're the bane of my hand and dish washing existence. So, I made some new ones!

Materials I Used:

2 small Mason jars with silver colored lids - $2.84 (I wanted silver colored and not brass ones like I usually find/ already have, as they matched the soap pumps I got better. Note to self: Really think about the color of the pump before you order and it doesn't match what you planned to make a dispenser out of!)

1 large pasta sauce Mason jar - Free (already had it after finishing the pasta sauce! I replaced the brass lid with a silver one from the little jar I bought.)

2 Soap pumps and threaded collars from One Dream Design - $10.50  (Plus shipping. I ordered new ones because the pumps on our already owned ones were terrible!)

Loctite 2 part 5 minute Epoxy - already owned (You can get this at any hardware/home improvement store,
 or use another permanent glue ie. Gorilla Glue.)


If you have access to a drill press, I reccomend using it. 
(EDIT: Forgot to mention that my charming and handsome husband, Kyle, used the drill press 
at his work to drill these for me! He's awesome :D )

However, a correctly used regular drill can get the job done.
Unless you have a bit specifically designed to cut a hole this size, I recommend starting with a smaller bit and 
working your way up to the size of part that goes into the top. (In this case, the white plastic bit on the pump.) 


BE SAFE! Wear eye protection, and clamp that sucker down!
 (Either with clamps or hands if you have someone to help you.)

Use a scrap block of wood underneath so you don't ruin your work surface.


Mix up your epoxy (or other glue) with a popsicle stick or some other disposable device. I used a lollipop stick.


This particular Epoxy is designed to set in 5 minutes 
(though I recommend letting it set up to 30 minutes to be really sure),
so if you are using this, move quickly because the mixture gets gummy within a few minutes. 

Glue the collar ring down over the drilled hole.
I suggest putting glue on both the ring and on the metal around the hole to get a good seal.


Let the Epoxy set for about 30 minutes. I know it's "5 Minute Epoxy" but trust me, I'm a professional. Not really, but I have used this stuff many times, so please try to resist the urge to mess with it until it is fully set!

Once it is dry and you can pick it up by the collar without anything falling off or sliding around, screw the pump on, and you've got yourself a brand new, totally awesome, mind blowingly fabulous mason jar soap dispenser!

Way to go! You did it!


Thanks for reading!

Budget Anthropologie Tutorial: Well Defined Lampshade

As promised in my previous Budget Anthro post, I put together my own version of Anthro's Well Defined Lampshade! (See it together with my DIY vintage book lamp base!)

Materials I used :

1 plain Lampshade - $5 
(I used a cheap one I already had from Target, but you can use any plain colored lampshade; one with bold prints may show through the pages when the lamp is lit.)

1 bottle of Mod Podge - approx $8 for 16 oz bottle 
(I recommend getting the weekly coupons from Michaels and using that to purchase a bottle if you don't already have one!)

1 Thrifted Dictionary -$2 
(You can use any old book, but I easily found a vintage dictionary at a local thrift store. You only need about 10-15 pages of a decent sized book. My book was a little over 9 x 11")


Scissors, Paint brush or Foam brush ( I switched to a foam brush after trying a large paint brush, it worked a lot better for me!) and Tray for Mod Podge (I used a Chinese food takeout container)

Project total: $15 (though I only spent an extra $2 since I already had mod podge and a lampshade.)


Keep in mind, Mod Podge can get messy so put something down to protect your work surface! I used some Kraft paper that came in a shipment box.


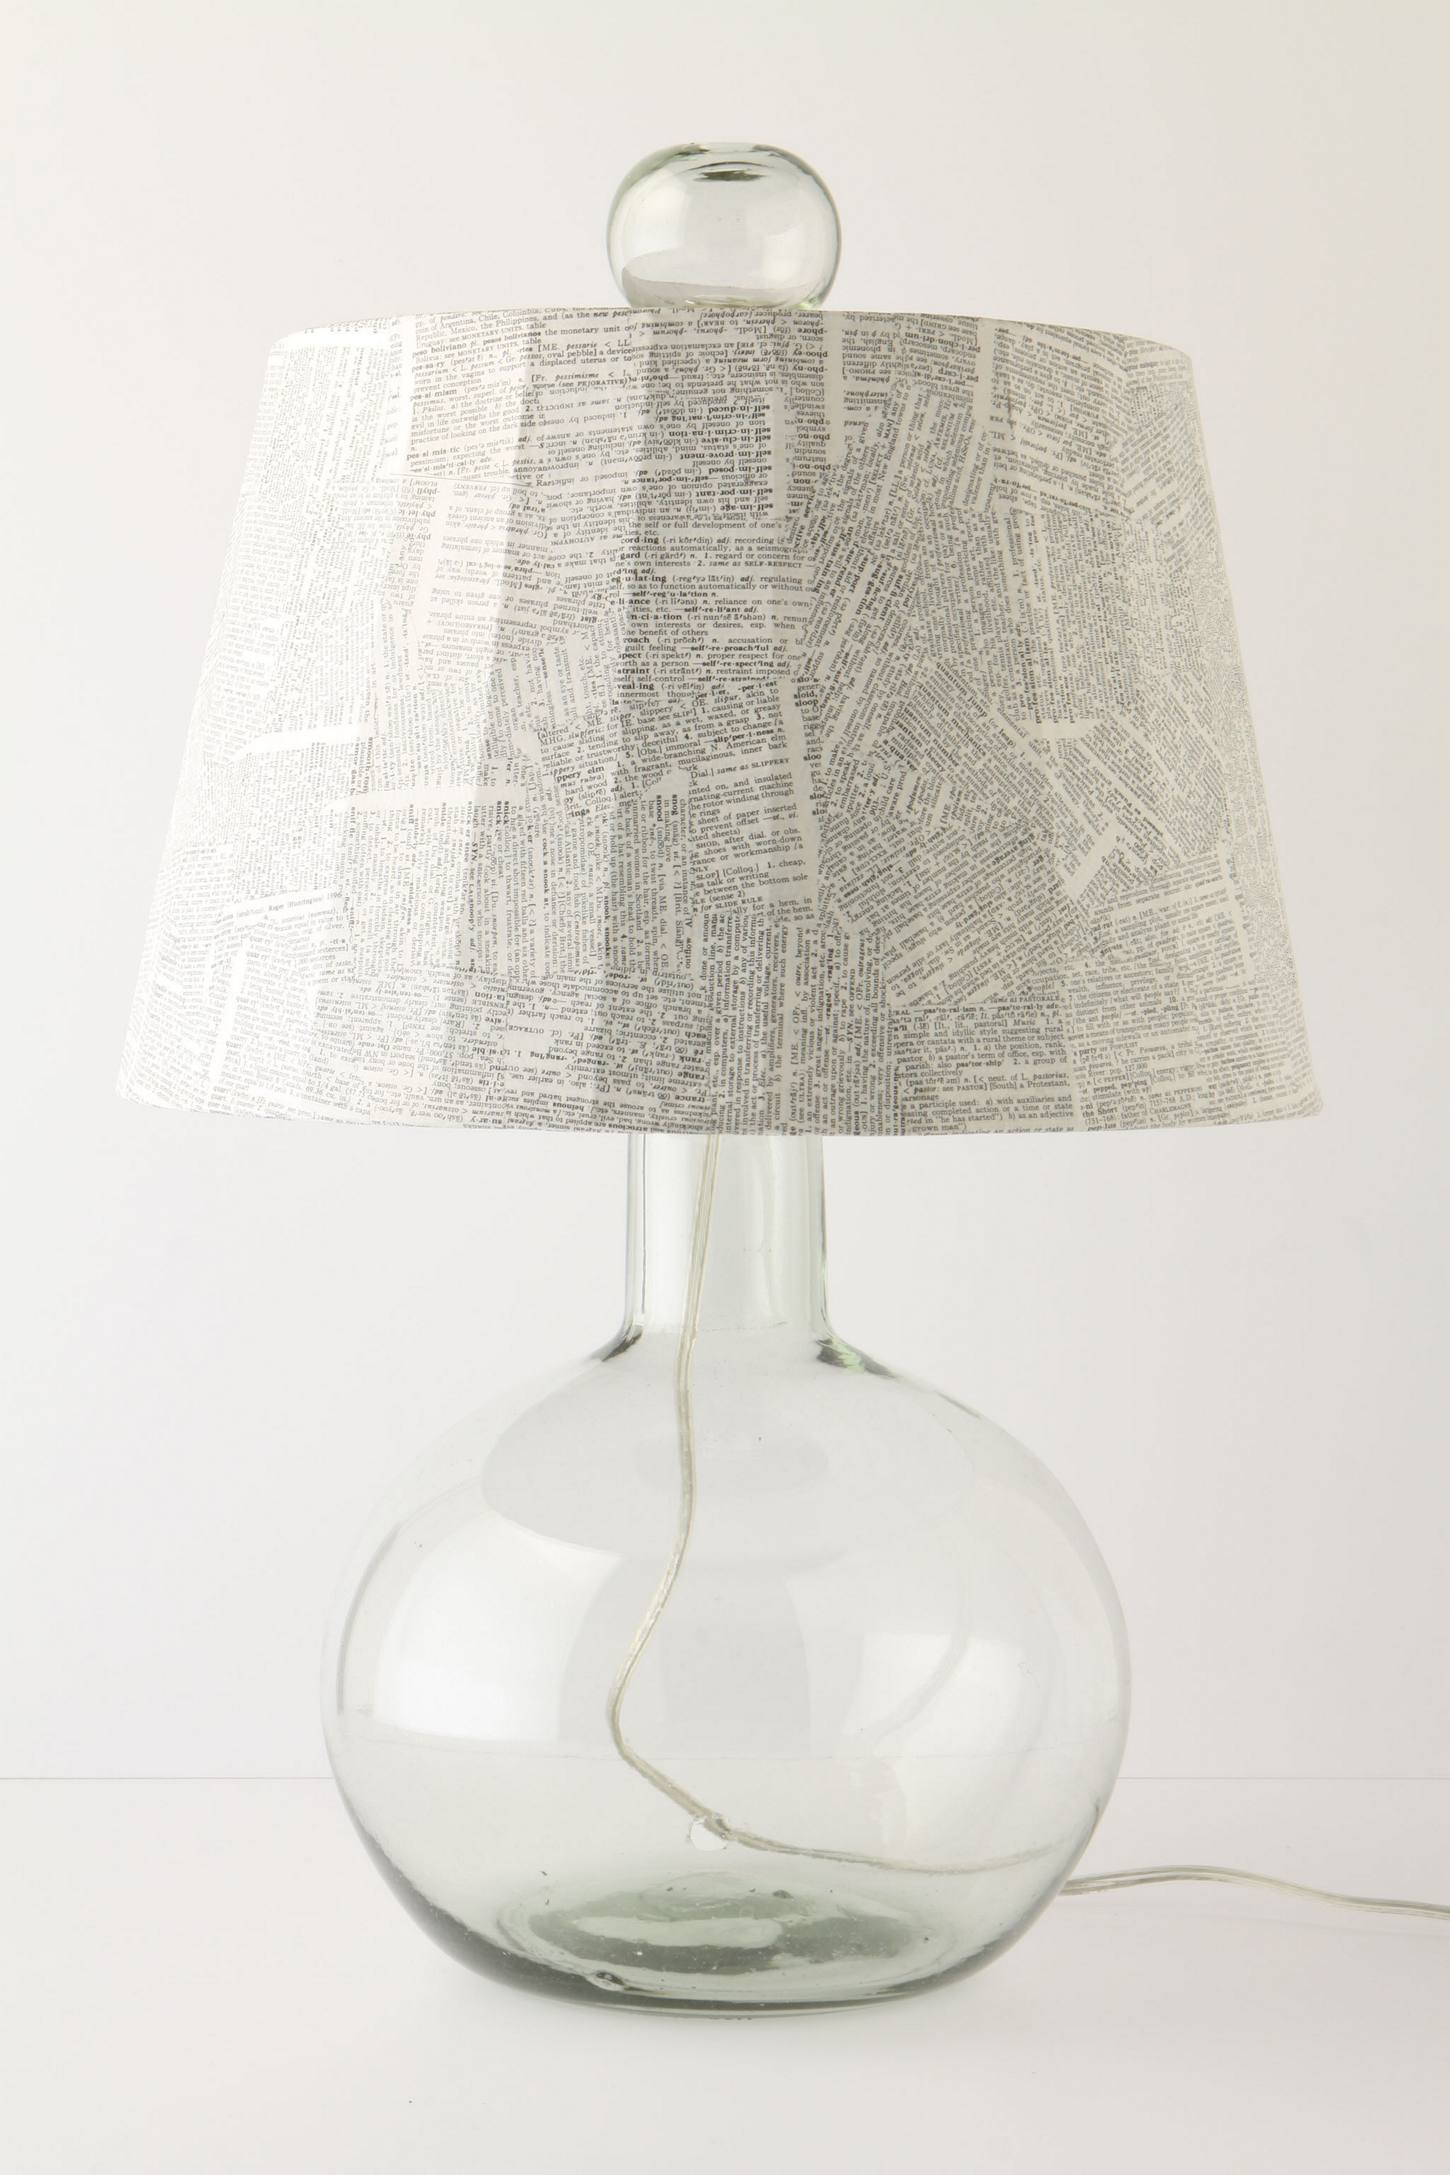
Cut your pages into strips, then into smaller rectangles, trimming the empty space around the text. You can cut as large or as small pieces as you would like, depending on the look you want. I tried to get close to the size used on the Anthro version, though I probably could have gone a little smaller.


Begin applying page pieces by first painting a layer of Mod Podge directly onto the lamp shade, then place pieces onto shade, and paint Mod Podge over the piece, smoothing out bubbles with your fingers and wrapping paper over edges of shade.


Repeat this process and continue to cover shade with book page pieces. I did 3 layers of pages, you can do as many as you want to get the look you want when the lamp is turned on. Fewer layers = more light coming through the shade. 

Let each layer dry before you do the next, and pay attention to pieces bubbling! Smooth them out gently with your fingers.

This is how the shade looks with 1 and 2 layers of pages respectively.


By the third layer your shade should look like this! 


Do a final top coat of Mod Podge to seal everything up, and you're done! Easy peezy lemon squeezy.


Enjoy your new lampshade, and thanks for reading! 


Whimsically Homemade


Tuesday, August 16, 2011

Budget Anthropologie: Lighting Edition

Hello my sweets! I don't usually do these types of posts, but I was browsing though the interwebs today and pulled together some budget friendly versions of Anthropologie lighting! I use the term "budget" loosely here, as I truly struggle to pay (and have not ever paid) full price for a lamp of any kind. I prefer to get a thrift store or yard sale lamp base and dress up the shade. But for those of you who are looking for a similar look to these Anthro ones and can't afford to drop 300 bones on a lamp, here are some more reasonably priced options!

I do love Anthropologie, and as an artist I do not advocate for blatantly knocking off other people's work, but I also don't advocate overpaying for a piece whose quality is probably not worth the money. (I do advocate paying a little more for something beautiful, high quality and handmade though!)

Most of these are obviously not exact matches, but they have a similar feel and many have very simple DIY hacks (custom lampshades, etc) you can do to get closer to look you want! Enjoy!


Anthro Found Decanter Lamp $498        Ikea JONSBO BÄRBY $59.99      


 World Market Stinson Glass Lamp $69.99  -   DIY Version 1 - DIY Version 2


Anthro Well Defined Lamp $199.95 on sale -  DIY Version (I made my own version for you guys! Check it out!)


Anthro One lump or Two lamp $198 -  DIY Version (This is one of the THE most DIY'ed Anthro lamps, so there are many tutorials!)


Anthro Camera Club Lamp  $268 - Axel Table lamp $85 - DIY Version (You could easily do a similar shade with some canvas and a deconstructed thrifted shade. let me know if you'd like to see me attempt it!)


Anthro Mechanic's beacon light $148 -  DIY Version (SO much cheaper! I love these.)

ADDED 8/19/11


Enjoy! Thanks for reading and stay tuned for the next edition of Budget Anthropologie!

more pretties to enjoy

Related Posts Plugin for WordPress, Blogger...